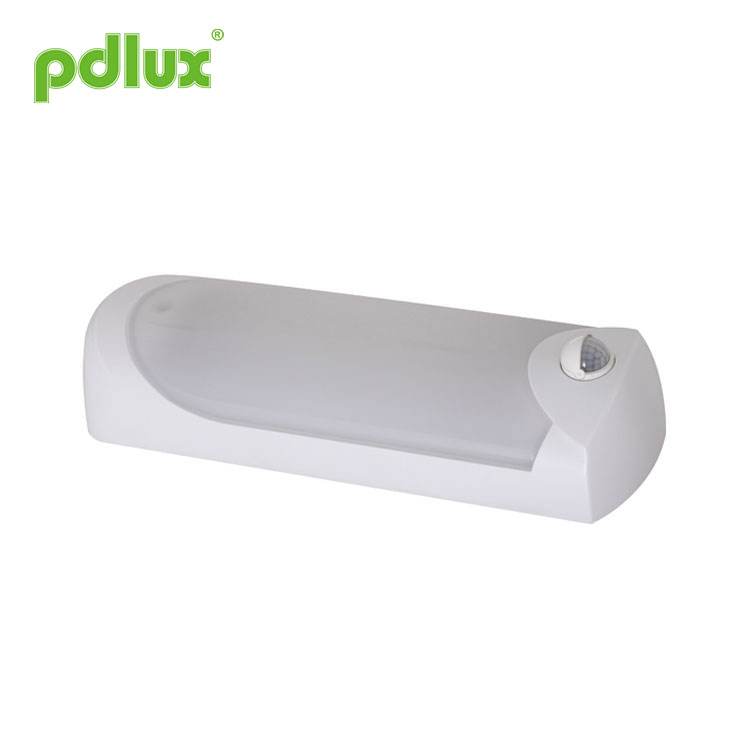


Dual Headlamp with Infrared Sensor
You can rest assured to buy Pdlux® Dual Headlamp with Infrared Sensor from our factory and we will offer you the best after-sale service and timely delivery. This product is an energy-saving lamp, which can turn on when one comes and turn off when leaves. It can identify day and night automatically. It adopts infrared energy discharging detector, IC and SMD technology its performance is stable and reliable. When one enters the detection field and trigger it, the infrared sensor will work and make the lamp on. When leaves, the lamp will die out automatically.
Model:PD-PIR2A
Send Inquiry
Product Details
As the professional manufacture, we would like to provide you Pdlux® Dual Headlamp with Infrared Sensor. And we will offer you the best after-sale service and timely delivery.
Specifications
|
Power source: |
220-240VAC |
|
Power frequency: |
50Hz |
|
Rated load: |
20W.max (10Wx2) |
|
Time setting: |
5sec ~7min±2min(adjustable) |
|
Detection angle: |
180° |
|
Detection range: |
12m (22~24℃) (adjustable) |
|
Light-control: |
<10LUX~2000LUX (adjustable) |
|
Luminous flux: |
1600lm |
|
LED quantity: |
20PCS |
|
LED specifications: |
3030 |
|
Installation height: |
2m~4.5m |
|
Working temperature: |
-10℃~+40℃ |
|
Working humidity: |
<93%RH |
Sensor information
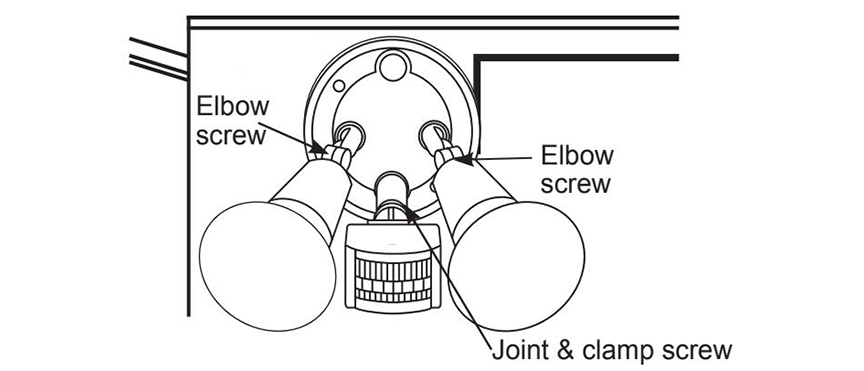
IMPORTANT: Loosen all screws on sensor and lamp arms before making any adjustments.
NOTE: Always face control knobs on sensor downwards to ensure correct operation.
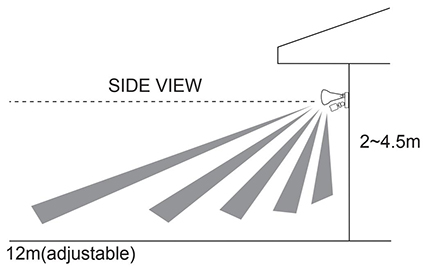
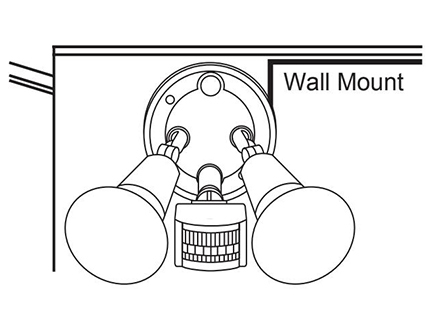
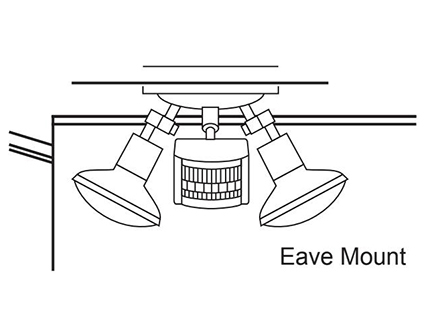
To achieve best results for exterior use, your Movement Activated Floodlight should be securely mounted to a wall or under eaves. For ideal operation the sensor head should be located approx 2.5m above the area where movement is to be sensed. This will provide the best scanning sensitivity and detection area.
|
|
|
|
Sensor can be angled above animal height to avoid nuisance triggering of lights |
Arrows indicate movement of heat source |

Product Details
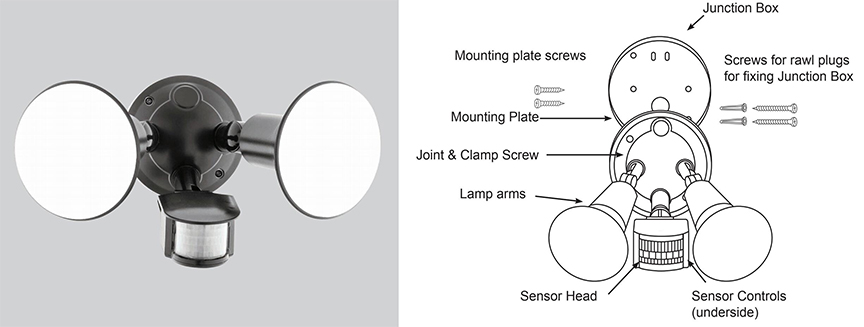
Installation
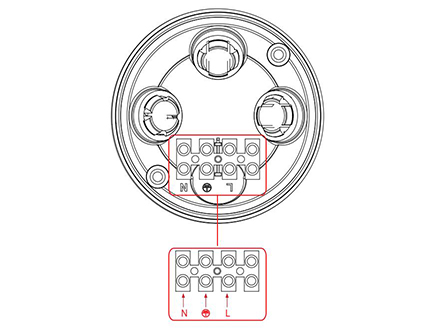
Installation and wiring must be performed by a licensed Electrician.
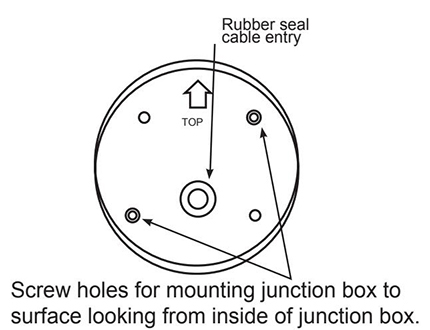
WALL MOUNTING
Open the junction box. Place the junction box back cover over the position for mounting and mark the screw holes. Use the two mounting holes on the inside of the junction box, and ensure the “TOP” marking points upwards.
Drill suitable holes, then feed the supply cable through the rubber seal on the rear of the junction box. Before fixing the junction box in place, seal any hole in the wall through which the supply cable passes so as to weatherproof it. Now fit screws to fix junction box to the mounting surface, again ensuring the “TOP” marking is pointing upwards.
EAVE MOUNTING
Use a similar procedure to wall mounting, but the “TOP” marking should point towards the outside of the eave. Take care not to damage or pierce concealed wiring with mounting screws, particularly when mounting under eaves.
|
|
|
|
A |
B |
|
|
|
|
C |
D |
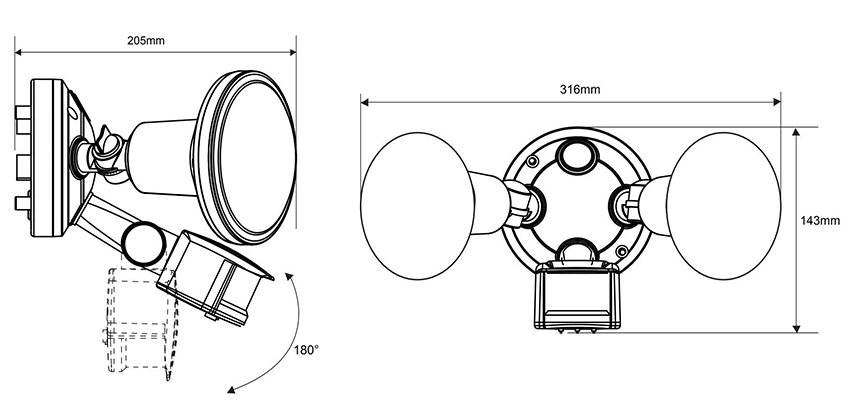
Setting up
Do not overtighten or use excessive forcewhen adjusting sensor head or lamp arms.
Loosen elbow/joint screws to make adjustment.
A. Adjust the direction of the sensor arm and lamp arms to suit the desired detection area. Loosen elbow screws on lamp arm before making any adjustments. Do not use excessive force when making adjustments to lamp arms.
B. Angle sensor slightly downward towards the detection area. The sensor joint should be rotated to adjust the sensor to face the required detection area. If necessary, loosen sensor arm joint clamp screw.
C. Angle lamp arms from mounting surface and direct them approximately downwards away from sensor head.
D. Tighten elbow screws - do not overtighten.
Test
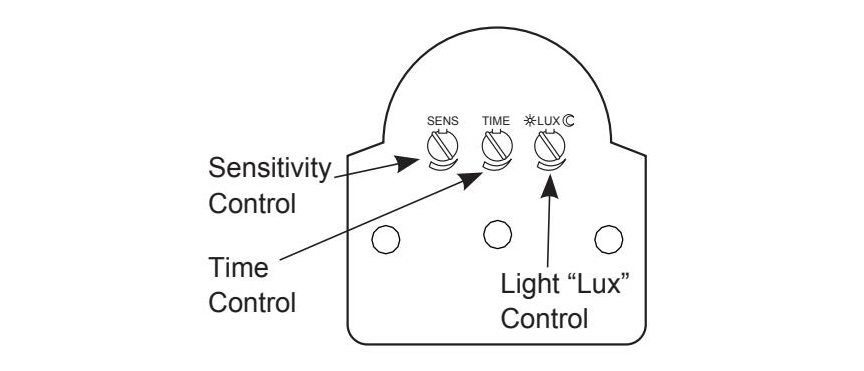
1. After installation, turn the power switch (SENS) fully counterclockwise and the time knob (TIME) counterclockwise until the power is turned on. Turn the light control knob (LUX) clockwise to its maximum value.
2 Switch on the power, the light can be on after 30sec. After it turns off, make it sense again after 5sec.
3. If all is good, you can adjust the light cycle by adjusting the time knob, you can adjust the light cycle according to your needs, you can adjust the light ambient light, adjust the knob to adjust the detection distance.
ATTENTION:
When use this product, please adjust the sensitivity to an appropriate position you need, please do not adjust the sensitivity to maximum, to avoid the product does not work normally caused by wrong motion.Because the sensitivity is too high easily detect the wrong motion by wind blowing leaves & curtains, small animals, and the wrong motion by interference of power grid & electrical equipment. All those lead the product does not work normally !When the product does not work normally, please try to lower the sensitivity appropriately, and then test it.
Note
Avoid installing it there is sunshine or air stream and temperature alter obviously.
Avoid impacting the lens device with sharp things and coarse pollutant.
If there is difference between product and instruction, please refer to product mainly.
Some problem and solved way
1.The load do not work:
a: Please check if the connection-wiring of power and load is correct;
b: Please check if the load is good ;
c: Please check if the working light set correspond to ambient light.
2.The sensitivity is poor:
a: Please check if there has hinder in front of the detection window to effect to receive the signal;
b: Please check if the ambient temperature is too high;
c: Please check if the induction signal source is in the detection fields;
d: Please check if the installation height corresponds to the height showed in the instruction;
e: Please check if the moving orientation is correct.
3.The sensor lamp can not shut off the load automatically:
a: Please check if there is continual signal in the detection field;
b: Please check if the time setting is the longest;
c: Please check if the power correspond to the instruction;
d: Please check if the temperature near the sensor lamp change obviously such as air condition or central heating etc.
Warning!
When used in different environments, please do not to adjust the sensitivity to the highest.Because that could easily lead to malfunction.
● Please confirm with prefessional installation.
● Please cut off power supply before installation and removal operations.
● Make sure that you have cut off the power for safety purposes.
● Improper operation caused losses, the manufacturer does not undertake any responsibility.
We are committed to promoting the product quality and reliability, however, all the electronic components have certain probabilities to become ineffective, which will cause some troubles.When designing, we have paid attention to redundant designs and adopted safety quota to avoid any troubles.This instruction, without our permission, should not be copied for any other purposes.